
Whether you’re setting up a server, fixing a connection issue, or testing a service, changing the IP address on Debian 12 is a straightforward task. It can boost both your network’s security and its overall reliability. In this guide, we’ll explore every option you might need, from giving your machine a permanent static address to swapping back and forth between DHCP and manual settings.
This guide walks you through every method for changing the IP address on Debian 12, providing clear, step-by-step instructions.
Table of Contents
How to Change an IP Address on Debian 12?
Debian 12, nicknamed Bookworm, relies mainly on systemd-networkd for servers and NetworkManager for desktop workstations. Which tool you use depends on how you’ve set up your system and what you’re most comfortable with. Take a moment to check your current setup so you know where to start and avoid unnecessary headaches.
Prerequisite: Create a Backup File
Before you tweak any network settings, make a quick backup of the current file with this command:
|
sudo cp /etc/network/interfaces /etc/network/interfaces.bak |
|---|
Let’s dive into the first method and get started.
Method 1: Editing the /etc/network/interfaces File
On Debian 12, the file /etc/network/interfaces tells the system how to set up each network port. Here, add IP address, netmask, gateway, and DNS values in that file. Once you save the change, restart networking so the new settings load.
Step 1: Open /etc/network/interfaces File
Start by opening the configuration file with the sudo rights you need. You can do that in the nano terminal editor like this:
|
sudo nano /etc/network/interfaces |
|---|

Step 2: Configure Network Interface
Scroll through the file until you see a line that begins with iface; that line shows you which device is being set. Suppose you want to adjust the Ethernet port lo, add these lines for a static setup (substituting your numbers as needed):
|
auto lo address 192.168.157.135 netmask 255.255.255.0 gateway 192.168.157.135 dns-nameservers 8.8.8.8 8.8.4.4 |
|---|
Users can replace or modify the addresses with their own:

You can swap the example values for your real network data right here. When you finish, save the file by pressing Ctrl-O, then hit Ctrl-X to exit.
Note: If you do not yet know the correct interface name, run nmcli connection show and check the Device Name column for a match.
IMPORTANT: Before you do anything else, double-check that the default gateway matches the assigned IP address if you’re using NAT or a bridged network. If it doesn’t, find the line that reads iface lo inet dhcp and swap dhcp for static, then repeat the steps above.
Step 3: Restart the Networking Service
Now you need to apply the new settings by rebooting the machine:
|
sudo systemctl restart NetworkManager.service |
|---|

Step 4: Confirm the Changed IP Address
It’s a good idea to confirm that the address is stuck:
|
ip a |
|---|

If everything went smoothly, the static IP is now active, thanks to the edits you made in /etc/network/interfaces on Debian 12.
Note: Remember that each method-debconf, this file, or any other-uses its own separate set of rules when it comes to changing an IP address on Debian.
Method 2: Using the nmcli
If you prefer a command-line tool, nmcli is built into NetworkManager and lets you tweak connections right from the terminal. With it, you can set the IP address, prefix length, gateway, and DNS servers all in one go.
If you want to set a new IP address on Debian 12 with nmcli, just work through these short steps:
Step 1: List Network Connections
First, bring up a list of all network connections by running nmcli, followed by connection show. The output shows each connection with its name, UUID, type, and device:
|
nmcli connection show |
|---|

Step 2: Configure Network Connection
No, we pick the Ethernet connection you want to change, for example, lo, and use its friendly name, ‘lo’, in the commands that follow. Now, configure/modify connection settings. Such as an IP address
- Assign/Set Static IP Address
|
sudo nmcli connection modify ‘lo’ ipv4.address 192.168.157.135/24 |
|---|

- Set Default Gateway
|
sudo nmcli connection modify ‘lo’ ipv4.gateway 192.168.157.2 |
|---|

- Change Configuration from Automatic to Static
|
sudo nmcli connection modify ‘lo’ ipv4.method manual |
|---|

- Optionally set DNS servers, like Google’s
|
sudo nmcli connection modify ‘lo’ ipv4.dns ‘8.8.8.8’ |
|---|

- Activate/Enable the Connection
|
sudo nmcli connection up ‘lo’ |
|---|

Finally, bring the connection back up so the new settings take effect.
If you ever need to roll back, simply run the same command but swap up for down to take the connection offline first.
Step 3: Verify Static IP Address
It’s a good idea to confirm that the address:
|
ip a |
|---|

Tip: Add or Delete Network Connection
To apply any adjustments, restart the NetworkManager service with: sudo systemctl restart NetworkManager. Alternatively, a full system reboot works too:
|
sudo nmcli connection add id connection_name # Add New Connection |
|---|
After running those commands, your static IP is now live on Debian 12.
Method 3: Using the nmtui
nmtui comes with the NetworkManager package and gives you a simple screen menu way to tweak settings. For modifying the IP address via this tool:
Step 1: Launch the nmtui Interface
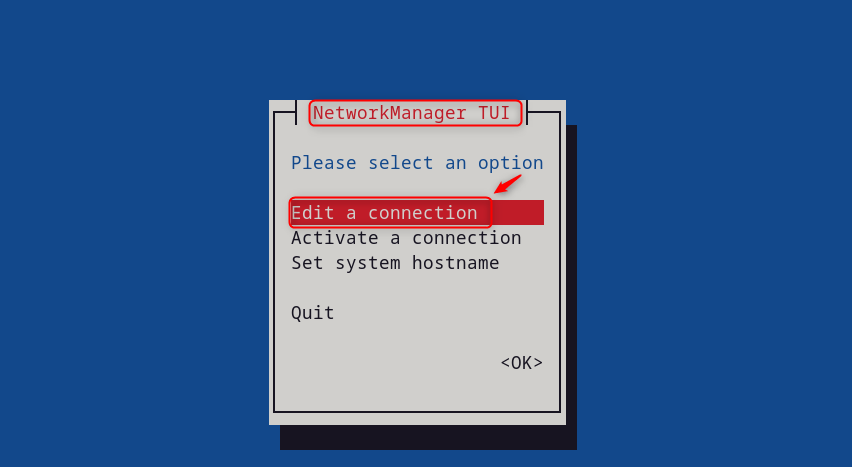
Open a terminal, type nmtui, then use the arrow keys and Enter to move around the menus.
Step 2: Edit a Connection
Pick Edit a connection, then press Enter.
Highlight the connection you want to adjust-say Wired connection 1-and press Enter again.
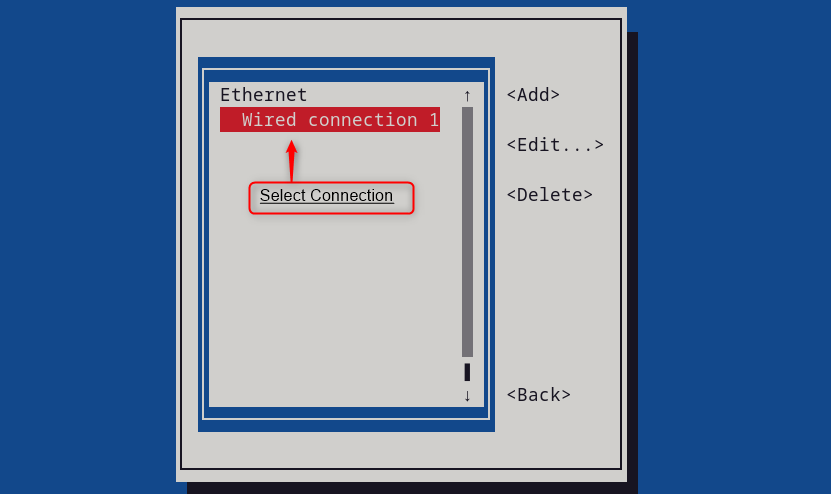
You’ll land on the Edit a connection screen. From there,
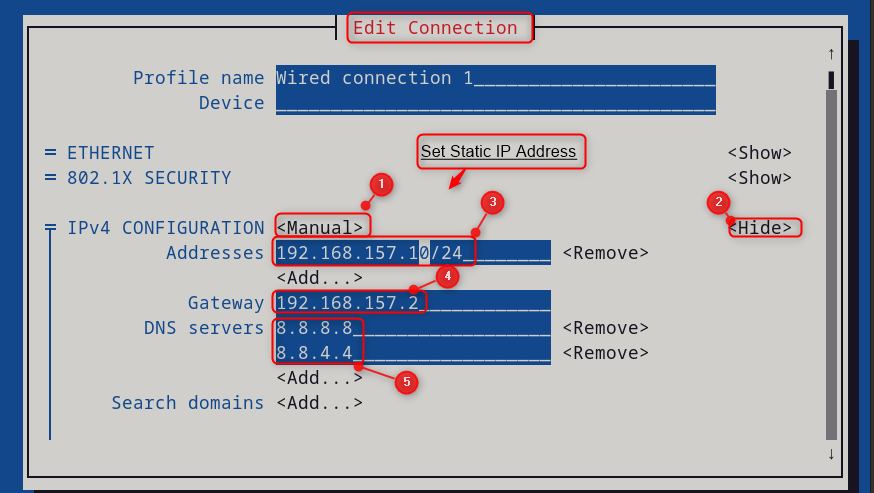
- Go to IPv4 CONFIGURATION, press Enter, choose Manual, and tap Enter once more to move forward.
- Select the Show button to add or modify the connection’s IPv4 addresses.
- Key in the static IP (192.168.157.10), gateway (192.168.157.2), and DNS servers (8.8.8.8, 8.8.4.4) you wish to assign.
Scroll down and click OK to save your entries and return to the previous screen:
Step 3: Restart the NetworkManager Services
To reboot the NetworkManager services, select the Activate a connection option. Then press Activate/Deactivate so the new settings take effect. Finally, tap Back and Quit to leave the tool:

Step 4: Verify Static IP Address
You can check the static IP by running the ip command with a switch in a terminal.

This section has walked you through assigning a static IP on Debian 12 with the nmtui interface.
Method 4: Using NetworkManager
If you installed the desktop version of Debian, NetworkManager is already steering your connections. This option will suit you perfectly if you like clicking buttons instead of typing commands.
Step 1: Click on the Network Icon
Start by clicking the small network icon in the top-right corner of the system tray, then choose Wired Settings from the drop-down menu.

Step 2: Access the Network Interface
Inside the Wired tab, tap the gear wheel next to the active interface you want to change.

Step 3: Edit Network Information
In the IPv4 screen, change the Method field from Automatic (DHCP) to Manual. Enter the IP address 192.168.157.135, the subnet mask 255.255.255.0, the gateway 192.168.157.135, and the DNS servers 8.8.4.4, 8.8.8.8. When done, hit Apply to commit your edits.

Note: If you hit a snag, double-check that the gateway matches the one listed under Details.
Step 4: Restart Network Interface
Turn the network switch off and back on so Debian reloads the new settings.

Step 5: Verification
To confirm your static IP was applied, return to the Details tab and check the address listed there.
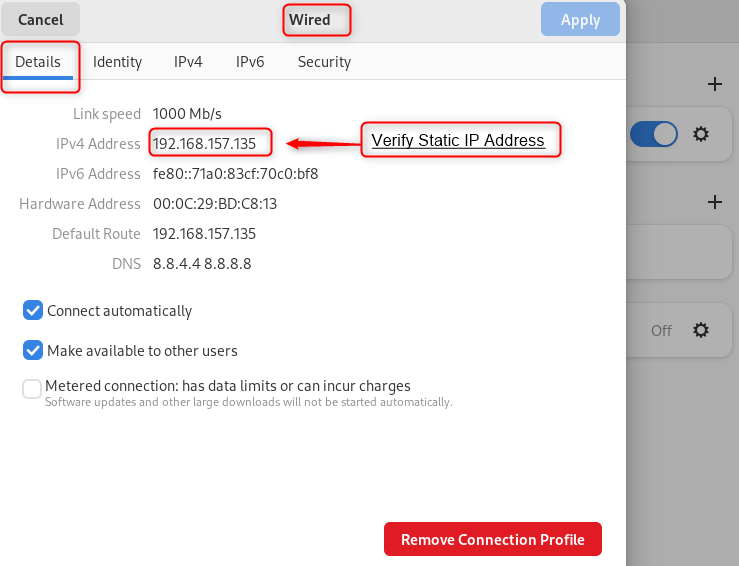
That’s the static IP that is now active on Debian 12 through the GUI.
Conclusion
You can change the IP address on Debian 12 by editing the /etc/network/interfaces file, or by working with the nmcli command, the nmtui text screen, or the full NetworkManager suite. It configures the static IP address. Each of these methods lets you set the static IP and gateway information so that your machine always uses the same address when it boots.
If you prefer a point-and-click approach, fire up the NetworkManager GUI, select your connection, switch to the IPv4 tab, and enter the details there. This guide has walked you through every feasible way to assign a permanent IP address on Debian 12.


Leave feedback about this