An IP address is essential when connecting a system to the Internet, as it allows for tracking, differentiating, and identifying users connected to the Internet. Furthermore, IP addresses are categorized into two types: dynamic IP addresses, which change every time the system connects to the Internet, and static IP addresses, which remain constant, unlike dynamic IP addresses.
Today, we will demonstrate four methods for configuring a static IP address on Ubuntu 24.04.
Outline:
How To Set Static IP Address on Ubuntu 24.04
When a device needs to be accessed via the Internet, static IP addresses are essential. If the IP address changes, the host system won’t be able to connect. Static IP addresses are usually used for applications that require server hosting, remote accessibility, or accurate geolocation. To set a static IP address on Ubuntu, use GUI system settings, netplan, nmcli, or nmtui. The simplest recommendation is to change the static IP address through the Ubuntu GUI.
Method 1: Using GUI
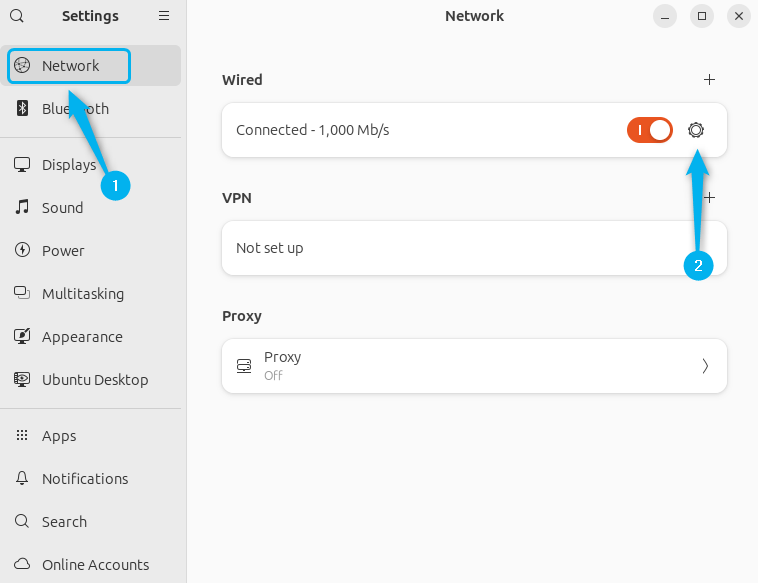
One of the simplest techniques to set a static IP address on Ubuntu 24.04 is by configuring it through Network settings. Open the Settings application and head to the Network section for either your wireless or wired connection:
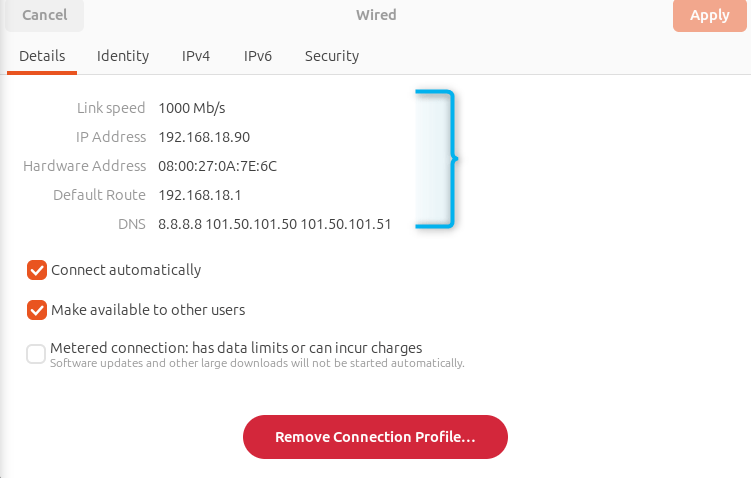
Now, in the Details tab, find the current IP address and subnet mask, then head to the IPV4 tab and select the Manual option:
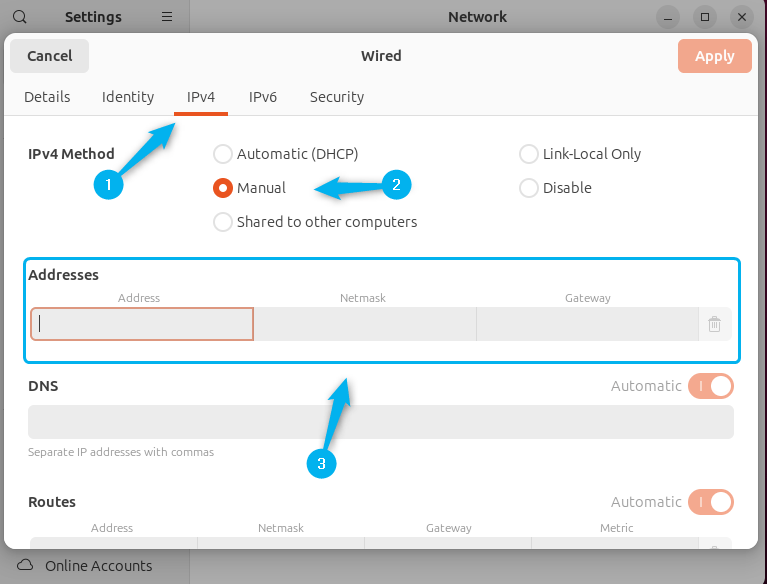
Next, fill in the desired IP address that ranges between 1 to that of the broadcast IP address:
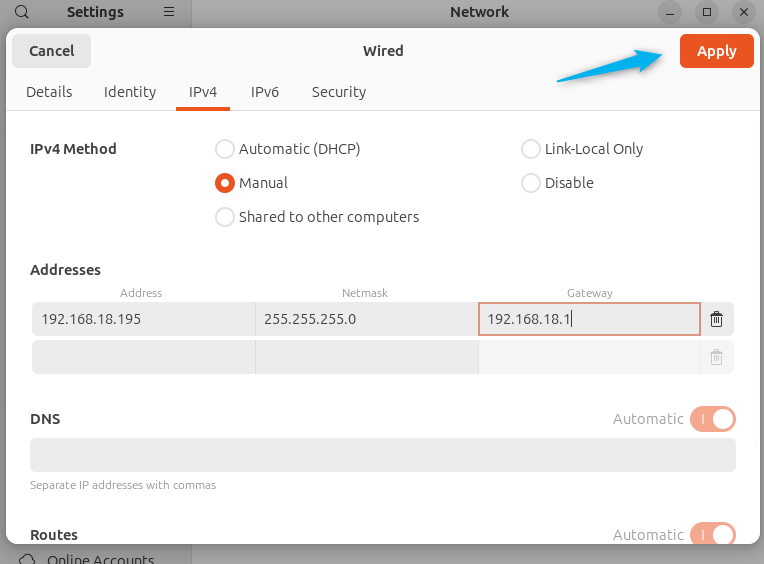
As an example, the highest IP address on this network in my case is 192.168.18.255. After you do that, verify all of the addresses and click on Apply to save the changes:
Confirm the changes on the Details tab:
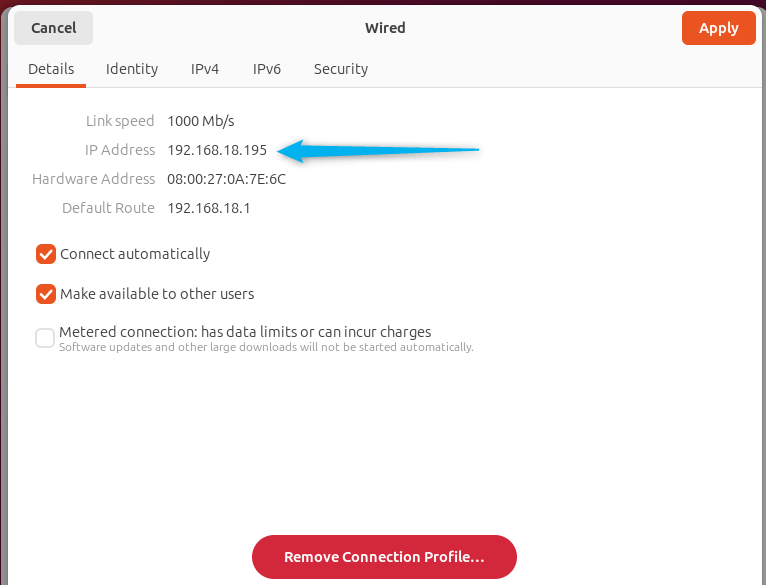
So this is the procedure to set a static IP for Ubuntu using its GUI.
Method 2: Using Netplan Utility
The Netplan is a command-line utility that was developed to help configure networks on Linux systems. It separates the network configuration from the two backends referred to as renderers in Netplan.
Network and network manager are the names of these two backends. So, change the original file extension from yaml to text with the following command:
cp /etc/netplan/01-network-manager-all.yaml 01-network-manager-all.txt

The Netplan permits users to create a file in the YAML format. This file contains the definition of network interfaces that are needed and their required configuration. To set a static IP address on Ubuntu using Netplan, you will have to set up the configuration manually for the particular connection. First, open the file by using the command that will display the contents and see what render and version is in place:
cat /etc/netplan/01-network-manager-all.yaml

Next, using any editor create a new configuration file with the following filename in the netplan folder:
sudo nano /etc/netplan/01-netcfg.yaml
Now, you will paste the provided code segment into the file and adjust the connection and renderer names as well as the static IP, gateway, and connection names of your choice:
network:
renderer: networkd
ethernets:
Enp0s3:
addresses:
- 192.168.18.175/24
nameservers:
addresses: [4.2.2.2, 8.8.8.8]
routes:
- to: default
via: 192.168.18.1
version: 2
Once the code has been pasted, the changes should be reviewed before saving the file:
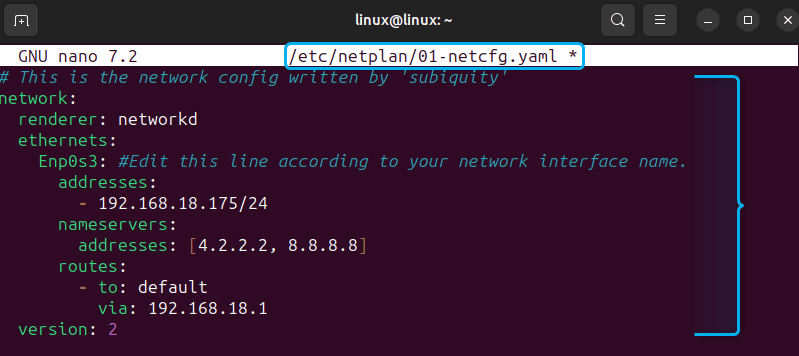
Now you can proceed to apply the network changes:
sudo netplan apply
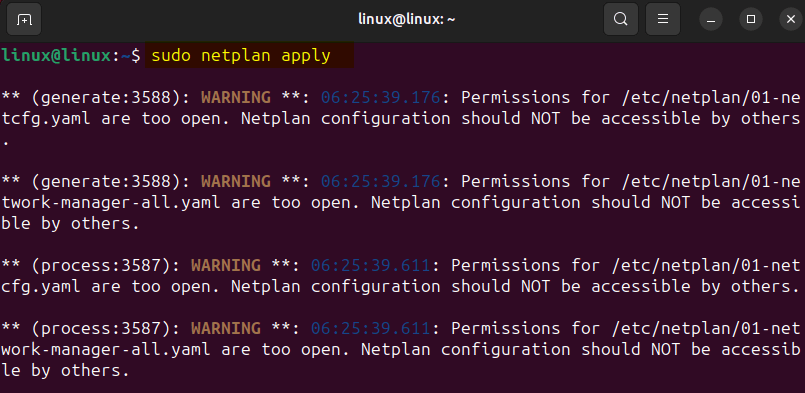
As stated in the image above, It can be seen there are a lot of “warnings” and it is very clear that they all have to do with the configuration file permissions for the file created earlier. Therefore, to remove them, try changing the file permission by using the following command:
sudo chmod 600 /etc/netplan/01-netcfg.yaml /etc/netplan/01-network-manager-all.yaml

Now, again apply the changes to these settings and check if the static IP address is changed by running:
ip a
Method 3: Using nmcli
For setting static IP address on Ubuntu 24.04, there is a new command line tool or utility known as nmcli. The main function of nmcli is to manage the network settings. Therefore, before starting with the configuration of the static IP address on Ubuntu, check the list of network connections using the command below:
sudo nmcli con show
Or
nmcli connection show

First, ensure that your desired static IP address is set with the connection name of the port your system is currently using. Here, my system is on port 24 of the router, to set a static IP address use the following command:
sudo nmcli con mod wired ipv4.addresses <desired-ip-address>/<port-number>

Next, set the Gateway IP for the default static IP. Use the following syntax for the gateway IP:
sudo nmcli con mod <connection-name> ipv4.gateway <desired-gateway-IP>

The gateway Domain name server is necessary to set the static IP on Ubuntu because it translates user-friendly domain names to IP addresses. To set DNS for static IP, use the following syntax:
sudo nmcli con mod <connection-name> ipv4.dns <desired-dns>

Next, change the configuration method of Internet Protocol Version 4 to manual. This allows you to set an IP Address, subnet mask, gateway, and DNS server for the connection:
sudo nmcli con mod <connection-name> ipv4.method manual

Now that all configuration details of static IP addresses have been provided, activate the connection using the ‘up’ command and the name of the connection:
sudo nmcli con up <connection-name>

The next instruction is to verify the change in the IP address, therefore, check the current IP address by executing the command:
ip addr show
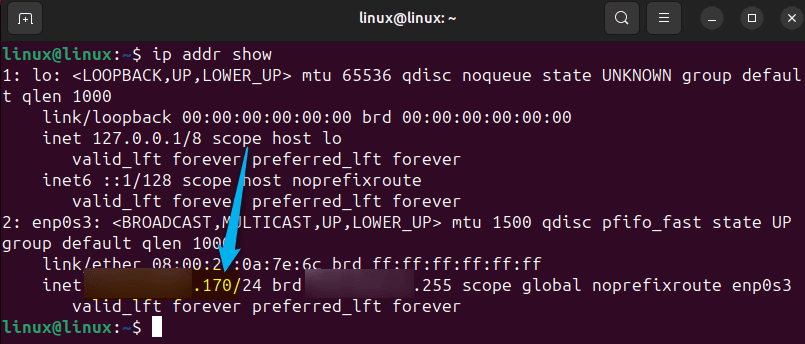
Method 4: Using nmtui
The Network Manager Text User Interface Utility can be used to configure Ubuntu’s static IP address. Now, let’s begin with how to configure a static IP address on Ubuntu by first looking for the broadcast IP, in my case it is 192.168.18.255:
ip a
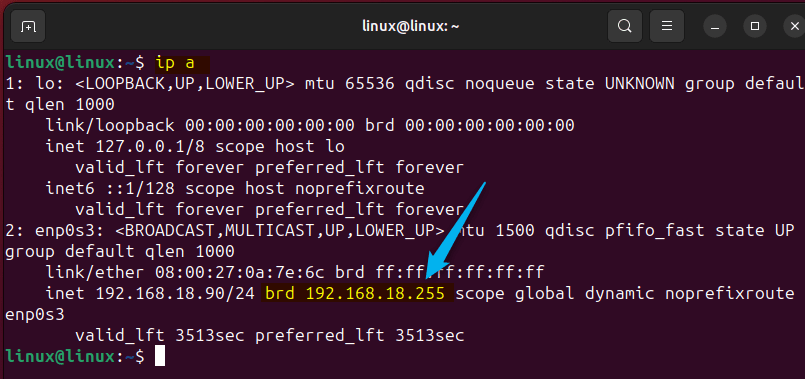
Now execute this command for the display browser with the activated interface in focus:
nmtui
Select the Edit a connection option in the small menu and set your desired static address:
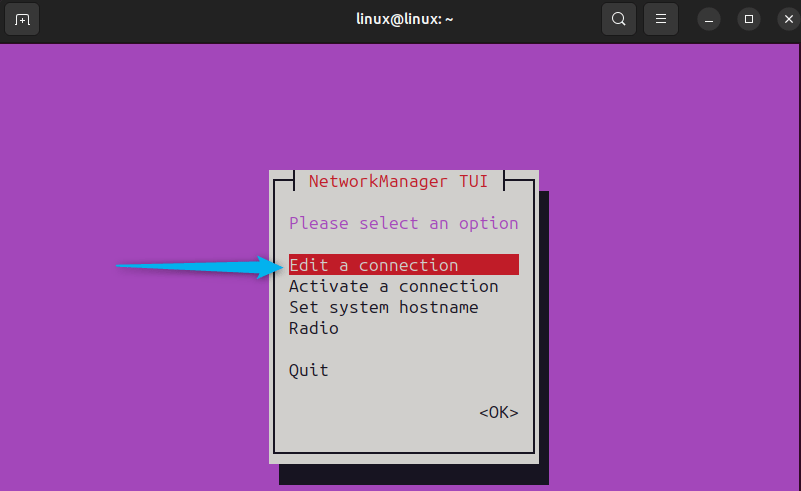
Once you have selected your connection, select Edit:
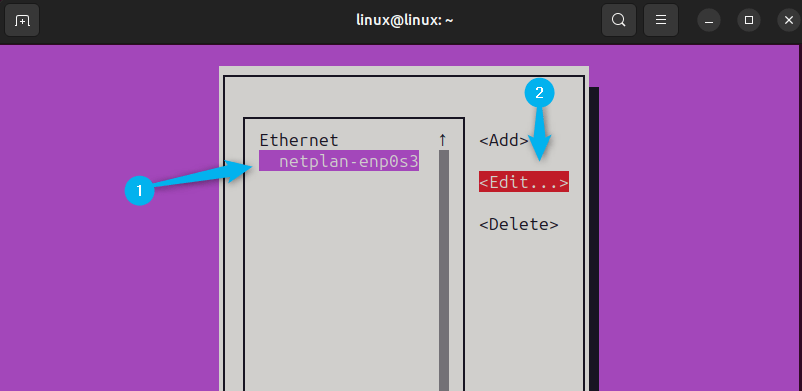
Switch to Manual configuration under IPv4 and you will see the nmtui set address interface. Afterward, move the cursor to the Show section to set the static IP address:

Then set DNS Servers, gateway, and the static IP address and return to the base menu:
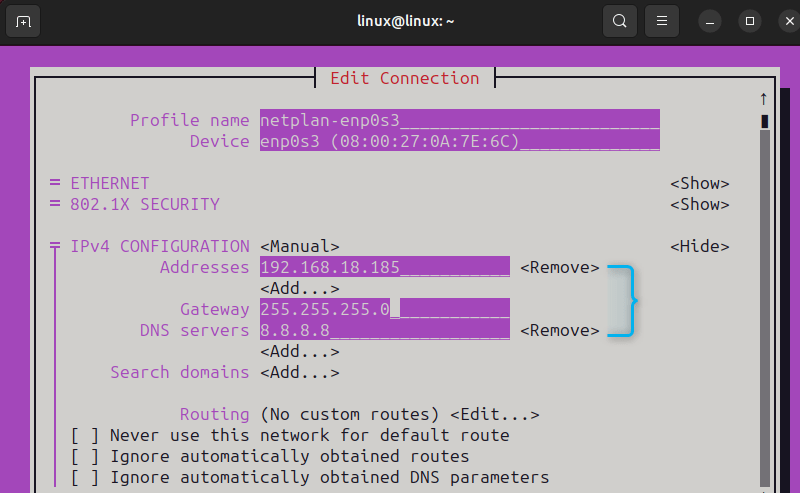
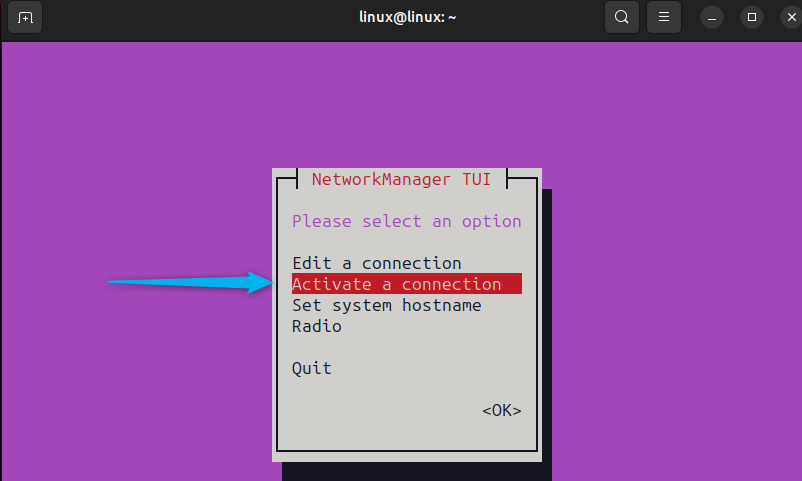
The primary menu will have other options Activate a connection:
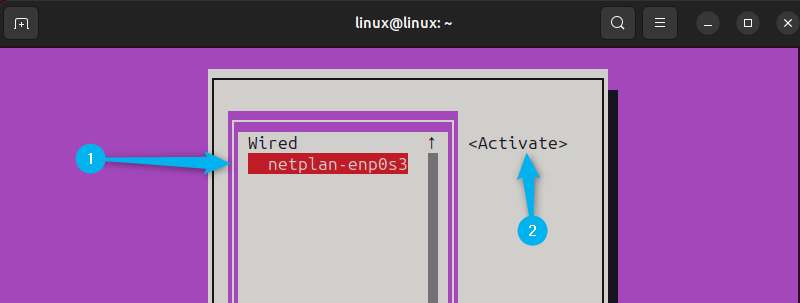
Now, choose the same network connection and hit Activate. It configures the IP address as static:
Lastly, identify your IP address on Ubuntu with this command:
ip a

That is all.
Conclusion
The static IP address can be useful for systems that need to be accessed remotely or automatically connected to a network. There are four different ways to configure the static IP address in Ubuntu. These include using its system network settings via its graphical user interface, nmcli, and nmtui. Ubuntu GUI is the recommended method for configuring static IP addresses because it’s the simplest.
Frequently Asked Questions
etc/netplan/. Modify the settings under the "ethernets" section, specifying the desired static IP, gateway, and DNS. /etc/netplan/, typically named 01-netcfg.yaml or similar. Use a text editor like nano or vim to modify the file. sudo netplan apply. This will activate the static IP settings. ip a or ifconfig to find the name of your network interface (e.g., eth0, enp3s0), which you will need to reference in the Netplan configuration. sudo netplan apply again or manually editing the file to ensure it's correct. 


Leave feedback about this