
cPanel, one of the most popular web hosting control panels, is used by server administrators for managing websites, databases, and emails. Installing cPanel for CentOS 10 transforms a Linux VPS into a fully-functional hosting environment with an intuitive graphical user interface. Whether you are managing multiple client accounts or hosting multiple websites, cPanel simplifies the server management process through automation.
This guide will walk you through installing and configuring cPanel for CentOS 10 to ensure your VPS is prepared for efficient and secure web hosting.
How to Install cPanel on CentOS 10
cPanel & WHM is a popular control panel that’s used by many web hosts. It allows you to manage domains, emails, DNS, and much more. Installing cPanel onto a newly deployed CentOS 10 Virtual Private Server allows you to transform a standard web server into a fully-featured web hosting environment with graphical interfaces.
Let’s walk you through preparing the server, installing cPanel, and performing the initial configuration to get you ready to host your website.
1. Pre-Installation Checks and Prerequisites
Check that your server meets these requirements before installing.
- Install CentOS 10 without any previous control panel or hosting service.
- It is recommended that you have at least 2 GB of RAM and 40 GB of free space on your hard drive.
- The static IP address of the public network and a fully qualified name, such as cpanel.example.com, which resolves to this IP.
- You must log in as root. During installation, any other user or sudo configuration will not be supported.
- Remove or disable any hosting software, DNS servers, or firewall configurations that may interfere. cPanel does not recommend installing other services before the installation process.
- cPanel and WHM are not officially supported on CentOS 10, as cPanel’s supported operating systems are primarily CentOS 7, AlmaLinux, and Rocky Linux. Therefore, attempting to install cPanel on CentOS 10 is not recommended and may lead to instability or unexpected issues.
2. Update Your System
Update all packages installed to the latest versions:
|
sudo dnf update |
|---|
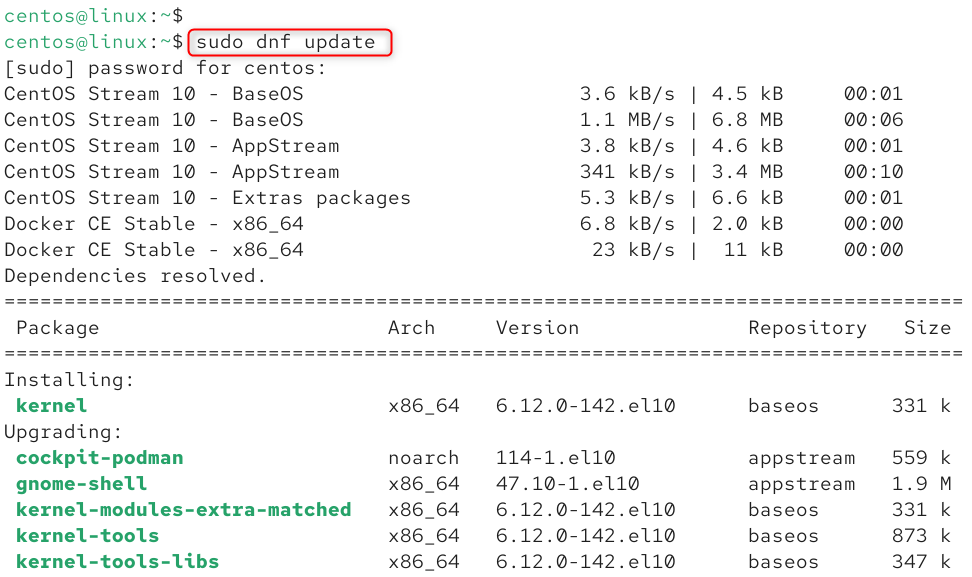
You can then work with a fresh, updated base system to avoid problems caused by outdated dependencies and kernel mismatches.
3. Set Hostname and Networking
Set up a fully qualified name (FQDN), or domain name, for your server:
|
hostnamectl set-hostname cpanel.example.com |
|---|

Edit /etc/hosts, and add a new line that maps your server’s address to the hostname:
|
127.0.0.1 cpanel.example.com cpanel |
|---|
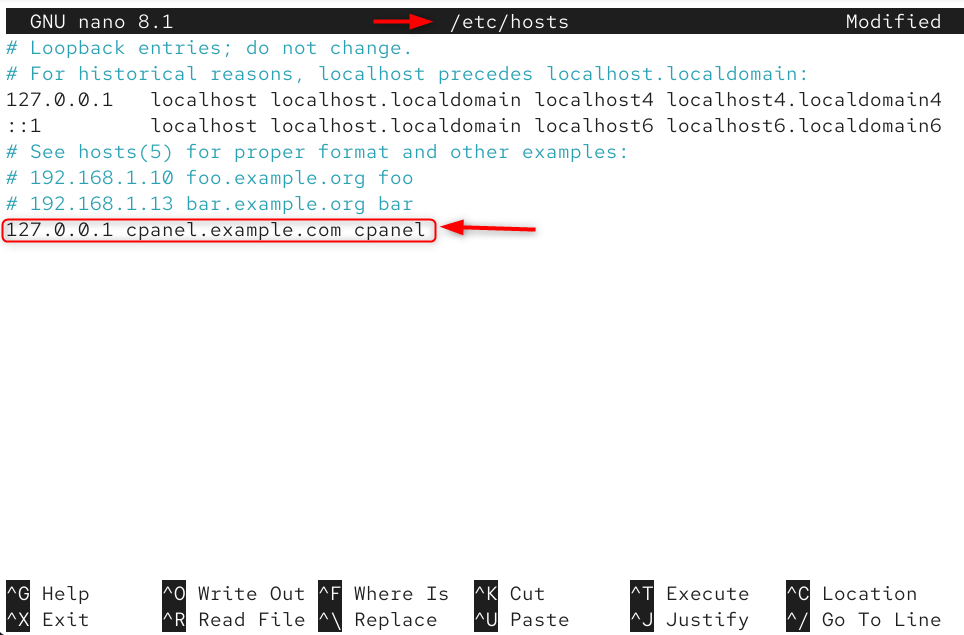
cPanel checks the hostname when installing, and a FQDN is required to avoid any setup warnings. Also, ensure that your DNS records (A Record) point to the IP of the server.
4. Disable Network Manager & Firewall (Temporary)
Before installing cPanel, it is recommended that you disable NetworkManager and stop the firewall:
|
sudo systemctl stop NetworkManager sudo systemctl disable NetworkManager sudo systemctl stop firewalld sudo systemctl disable firewalld |
|---|
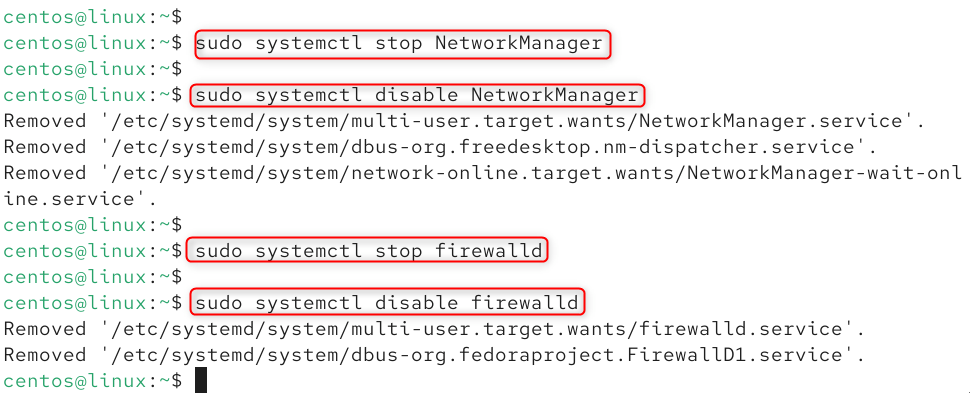
Installers expect minimal interference from firewalls and network management tools. You can configure and re-enable a compatible firewall after installation (such as CSF or the built-in options in cPanel).
5. Download and Run the cPanel Installer
Run the official installation script by switching to /home:
|
sudo -i su – cd /home curl -o latest -L https://securedownloads.cpanel.net/latest sh latest |
|---|
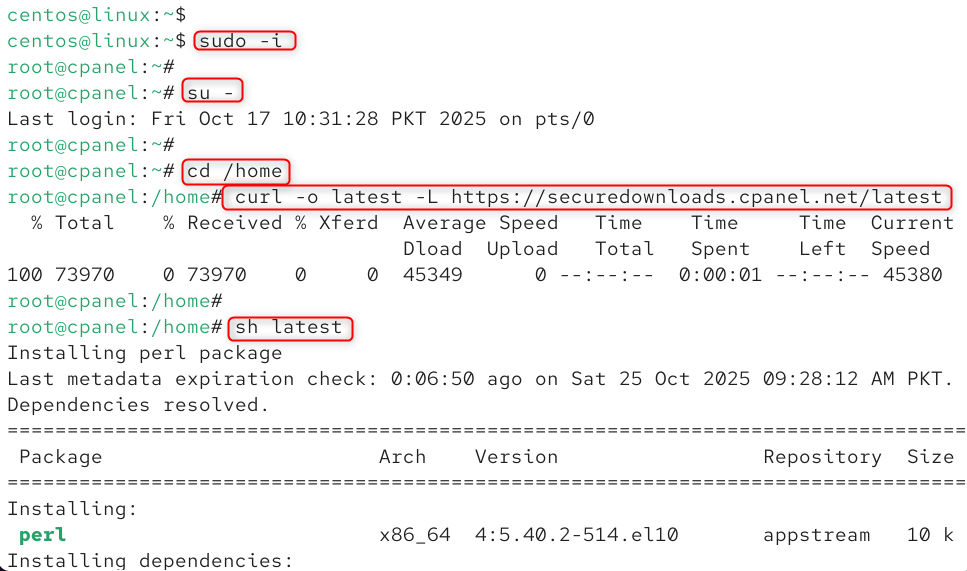
This command executes the cPanel Installer, which automates service setup, package installation, and WHM initialization.
Installation may take between 30-60 minutes, depending on the server specifications and your internet connection.
6. Access WHM for Initial Setup
Open your browser to the following URL:
|
https://<your-server-ip>:2087 |
|---|
Use your root password to log in as the user root. 
You will be asked to accept the license and enter your contact email. Nameservers, or any other initial options, can also be set.

WHM (WebHost Manager), also known as cPanel, is an administrative interface. You can manage services, create accounts, configure DNS, and perform regular maintenance.
7. Post-Installation Tasks
- Change the root password to increase security.
- Create glue records and nameserver records at your domain registrar (e.g., ns1.example.com, your IP).
- Configure DNS resolvers (e.g., 127.0.0.1, upstream DNS, and other DNS) in WHM so that the server can resolve domains.
- Re-enable the firewall functionality. In WHM, you can install a firewall, such as CSF, and allow ports needed (2087,2083,80,443).
- Secure logins and website traffic by enabling SSL (AutoSSL, Let’s Encrypt, or AutoSSL) for WHM/cPanel.
8. Licensing and Support
cPanel requires a license. You will usually have a 15-day trial period after installation before purchasing a license.

Be sure to register the license and set up automatic updates to receive security patches and new features. You can also read about the advantages of using: Let’s login:

Let’s verify the main cPanel interface:

Conclusion
Installing cPanel onto a CentOS 10 Virtual Private Server activates a powerful control panel for web hosting that simplifies the management of websites, emails, DNS, and databases. To install cPanel & WHM on your server, run the following command: cd /home && curl -o latest -L https://securedownloads.cpanel.net/latest && sh latest. By following the steps above, preparing your server, disabling interfering services, running the installer, and performing initial configuration, you’ll have a robust hosting platform ready for clients or personal use. After installing the software, you should secure your server and maintain your license.


Leave feedback about this