One mistake in deployment, one forgotten environment variable, one misplaced file can take down a live application and cause thousands of dollars in downtime for businesses every minute. That is why automatic deployments using Git have become the norm in every startup, enterprise, and in between.
Git is a lot more than a version control system. Combined with the appropriate automation tools and processes, Git is the event that kicks off your full deployment process, automatically triggering tests, builds, and shipping code to production when a developer pushes a commit or merges a pull request.
Throughout this guide, you’ll learn how automated deployments work using Git, check out deployment examples from real-world developers, and create a deployment process that automates the deployment of your applications without any manual processes.
Table of Content
- What Is Git-Based Automatic Deployment?
- Method 1: Git Hooks for Automatic Deployment
- Method 2: GitHub Actions for Automatic Deployment
- Method 3: GitLab CI/CD for Automatic Deployment
- Git Branching Strategy for Automatic Deployments
- Security Best Practices for Git Automatic Deployments
- Real-World Deployment Workflow: End-to-End Example
- Conclusion
What Is Git-Based Automatic Deployment?
Automatic deployment using Git is a software delivery technique that involves performing a series of steps automatically when code is pushed to a particular branch of a Git repository. These steps may include running tests, building the application, and deploying it to a testing or production server, without the need to manually trigger any of these steps by a developer or operations team.
This is the foundation of most CI/CD pipelines, otherwise known as Continuous Integration and Continuous Deployment. The entire deployment process is version-controlled and codified and takes place automatically every time code changes are introduced into the repository, rather than a developer having to SSH into a server and run deployment scripts. This means you’ll enjoy quicker release cycles, fewer human mistakes, identical deployment environments, and a complete record of all changes made to production.
There are three popular ways to use Git automatic deployments: Git hooks, GitHub Actions / GitLab CI, and webhook-based deployment servers. Each of them has its own use, and depending on the complexity of their infrastructure, professional teams will use them together.
Method 1: Git Hooks for Automatic Deployment
The first method is to use Git Hooks for automatic deployment. Scripts that are run by Git before or after particular events, like a commit, push, or merge, are known as Git hooks. They reside in the .git/hooks/ directory of your repository and may be written in any scripting language, such as Bash, Python, Ruby, or Node.js.
The most powerful hook for automatic deployment is the post-receive one, which is executed on the remote (server-side) repository after it has been pushed by a developer’s local repository.
Real-World Example: Deploying a PHP Website with a Post-Receive Hook
In this example, we will create a PHP website that uses a Post-Receive Hook that is deployed in the real world. This is one of the most popular Git deployment patterns for small to medium-sized web applications deployed on a VPS or dedicated server.
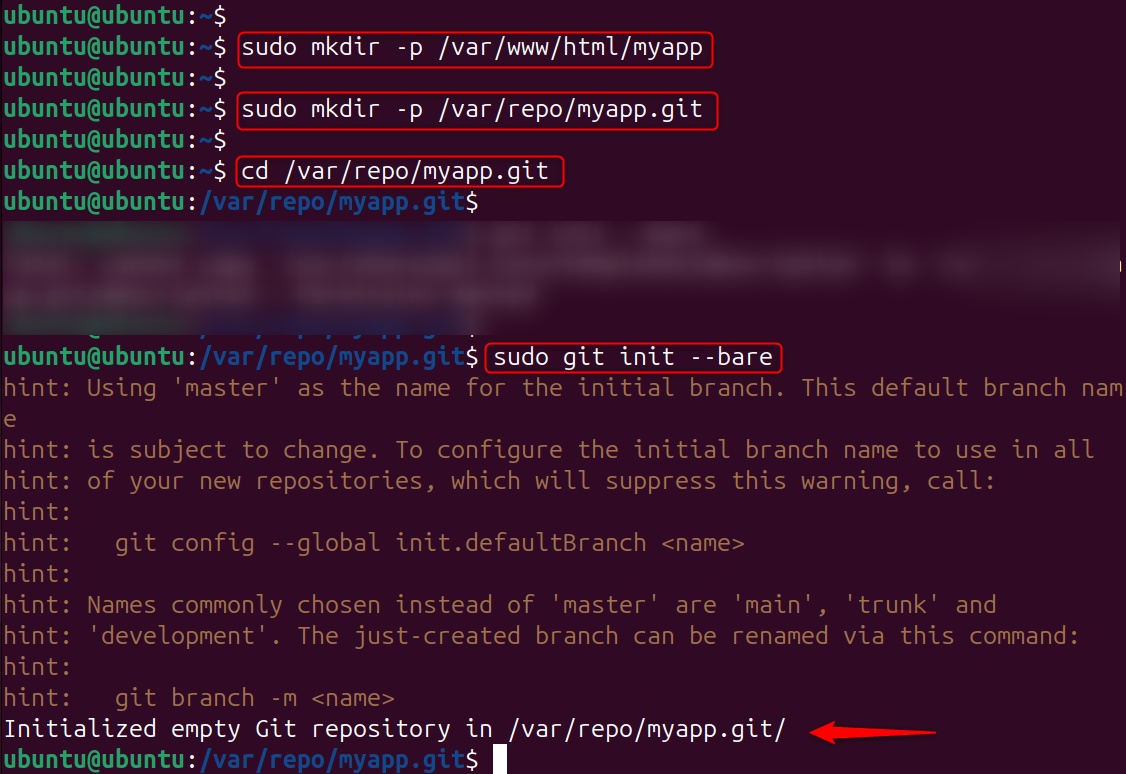
Step 1: Create the Deployment Directories
Create the bare Git repository on your server, and the deployment directory where your application files will reside:
|
sudo mkdir -p /var/www/html/myapp sudo mkdir -p /var/repo/myapp.git cd /var/repo/myapp.git sudo git init –bare |
|---|

Step 2: Create the post-receive Hook
Now, create the post-receive hook script that will automatically deploy your code every time a push is received:
|
nano /var/repo/myapp.git/hooks/post-receive |
|---|
Add the following deployment script:
|
#!/bin/bash TARGET=”/var/www/html/myapp” GIT_DIR=”/var/repo/myapp.git” BRANCH=”main” while read oldrev newrev ref; do PUSHED_BRANCH=$(echo $ref | sed -n ‘s/refs\/heads\///p’) if [ “$PUSHED_BRANCH” = “$BRANCH” ]; then echo “Deploying branch: $PUSHED_BRANCH to $TARGET” git –work-tree=$TARGET –git-dir=$GIT_DIR checkout -f $BRANCH echo “Deployment complete.” fi done |
|---|


Save and close the file, then make it executable:
|
sudo chmod +x /var/repo/myapp.git/hooks/post-receive |
|---|


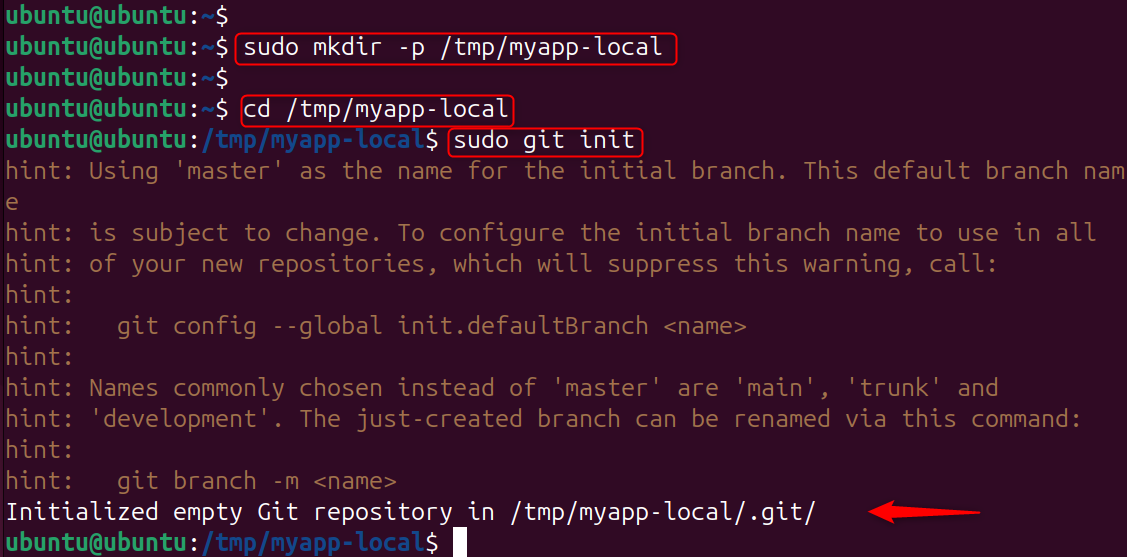
Step 3: Set Up Your Local Project Repository
On your local machine (or in a separate directory on the same Ubuntu machine for testing), create a new project and initialize it as a Git repository:
|
sudo mkdir -p /tmp/myapp-local cd /tmp/myapp-local sudo git init |
|---|

Set up a local project repository by configuring the email and name:
|
sudo git config user.email “dev@myapp.com” sudo git config user.name “Developer” sudo git checkout -b main |
|---|


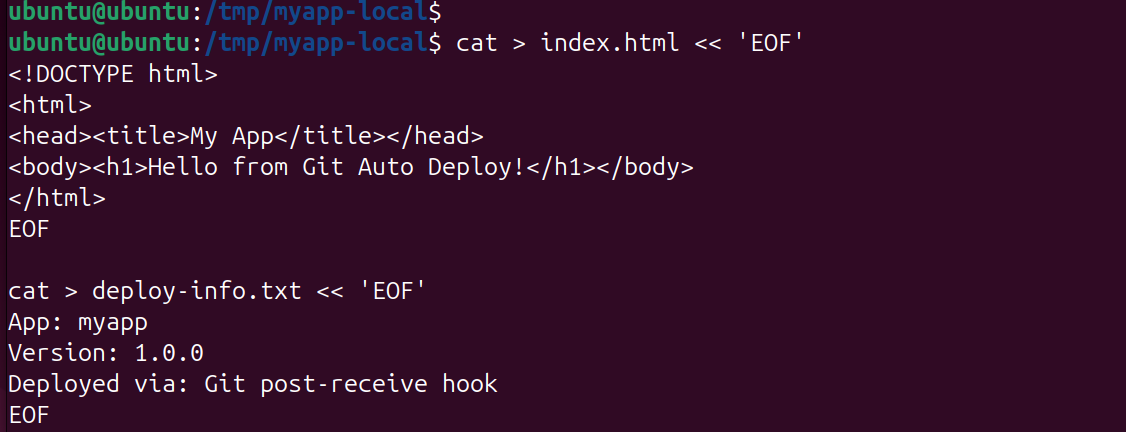
Create your application files:
|
cat > index.html << ‘EOF’ <!DOCTYPE html> <html> <head><title>My App</title></head> <body><h1>Hello from Git Auto Deploy!</h1></body> </html> EOF cat > deploy-info.txt << ‘EOF’ App: myapp Version: 1.0.0 Deployed via: Git post-receive hook EOF |
|---|

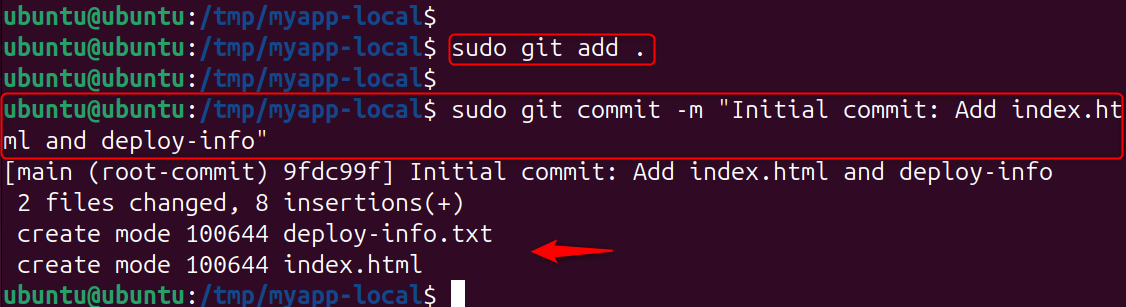
Commit the files:
|
sudo git add . sudo git commit -m “Initial commit: Add index.html and deploy-info” |
|---|

Step 4: Add the Server as a Remote and Push
Add the bare repository on your server as a remote named production, then push your code:
|
sudo git remote add production /var/repo/myapp.git sudo git push production main |
|---|

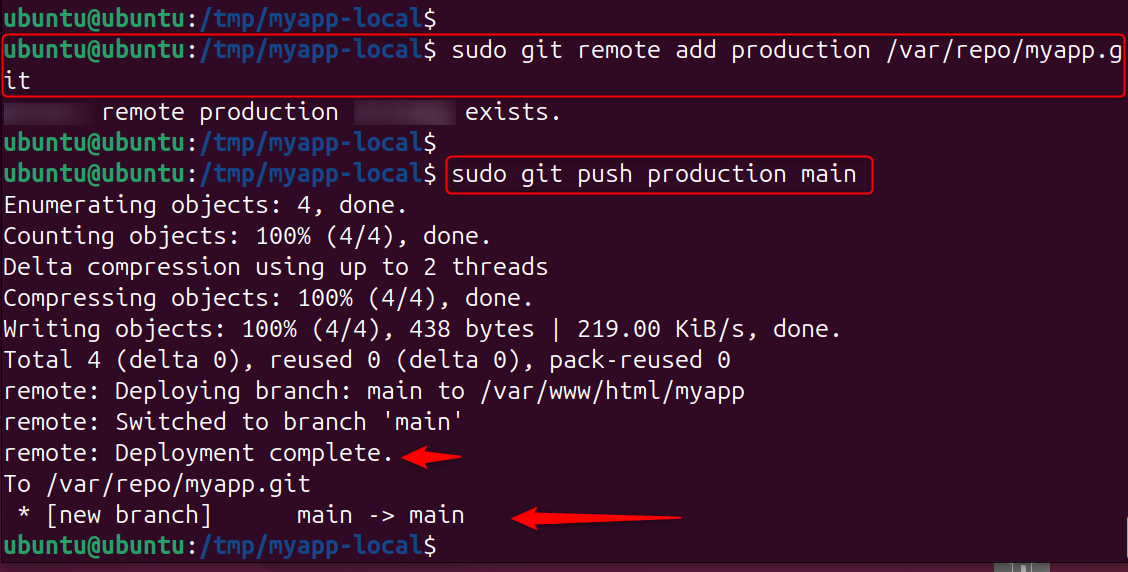
The three remote: lines are the output from your post-receive hook executing on the server, confirming that the code was automatically deployed to /var/www/html/myapp the instant the push completed.
Verify the deployed files:
|
sudo ls -la /var/www/html/myapp/ sudo cat /var/www/html/myapp/index.html |
|---|

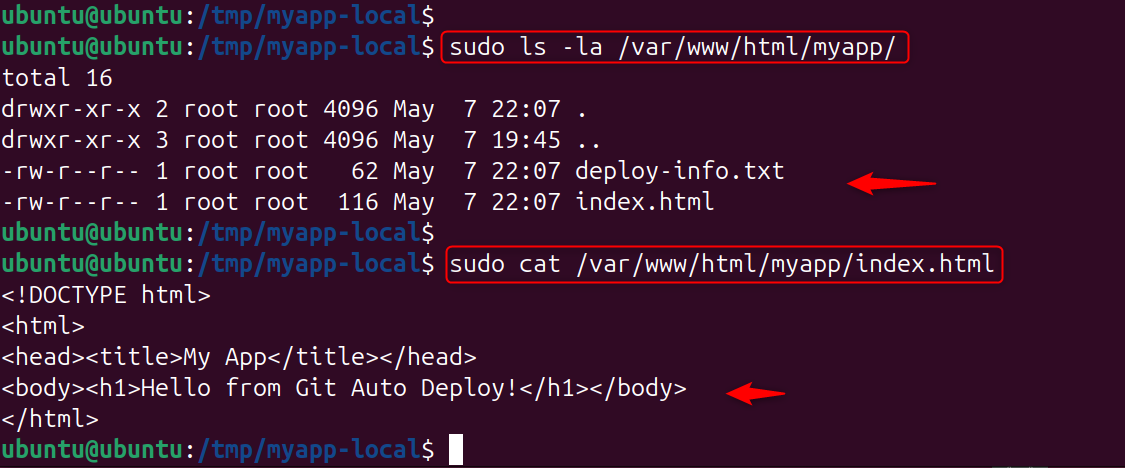
Your application files are now live in the deployment directory, deployed automatically by a single git push command.
Step 5: Test a Second Deployment (Version Update)
Update your application and push again to prove that automatic deployment works for every subsequent push, not just the first one:
|
cat > index.html << ‘EOF’ <!DOCTYPE html> <html> <head><title>My App v2</title></head> <body> <h1>Hello from Git Auto Deploy – Version 2!</h1> <p>Updated automatically via Git push.</p> </body> </html> EOF cat > deploy-info.txt << ‘EOF’ App: myapp Version: 2.0.0 Deployed via: Git post-receive hook EOF |
|---|
Add the bare repository on your server as a remote named production, then push your code:
|
sudo git add . sudo git commit -m “v2.0: Update index.html with version info” sudo git push production main |
|---|

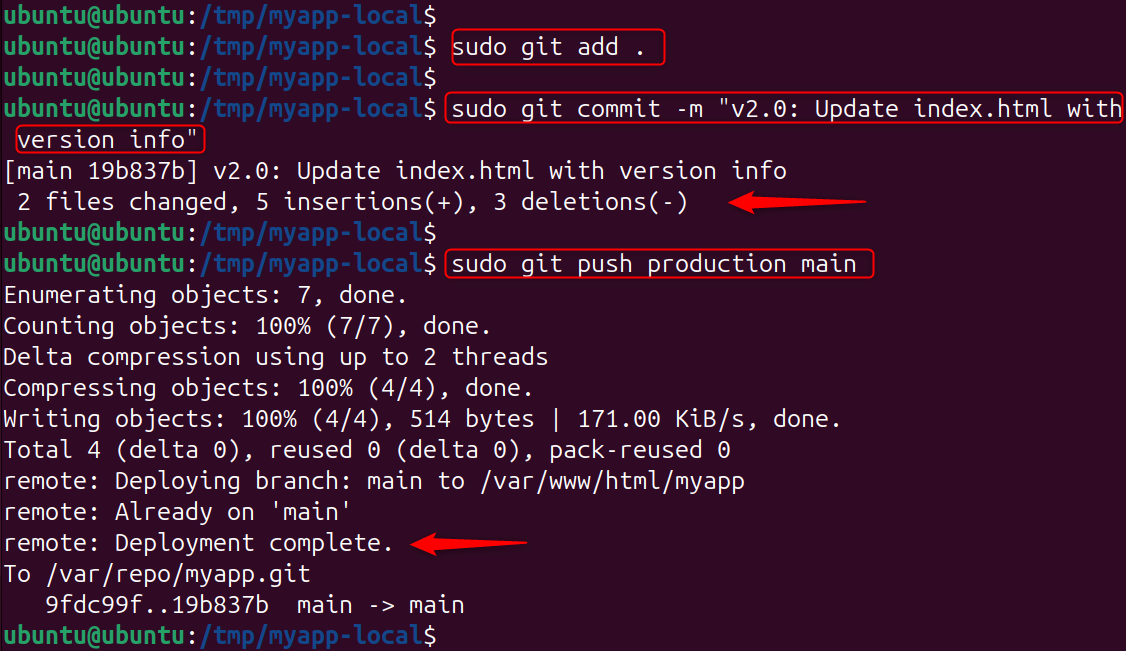
Verify the update was deployed:
|
sudo cat /var/www/html/myapp/deploy-info.txt |
|---|


Every push to the main branch now automatically deploys to your server with zero manual steps.
View full Git commit history and remote info.
|
sudo git log –oneline –graph –all sudo git remote -v |
|---|

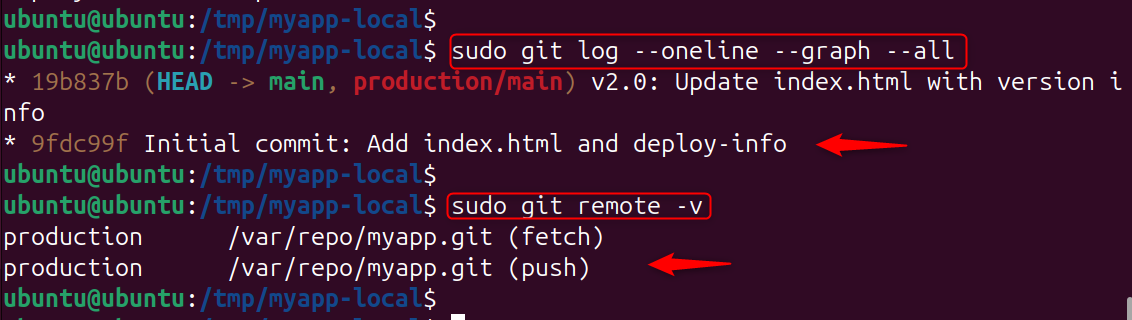
The git log confirms that two successful automated deployments are recorded in the version history, giving you a complete audit trail of every release.
Method 2: GitHub Actions for Automatic Deployment
GitHub Actions is a cloud-native CI/CD platform built directly into GitHub that defines automated workflows using YAML files stored inside .github/workflows/ in your repository. It is the most widely used Git automatic deployment tool for teams hosting code on GitHub.
Real-World Example: Create the GitHub Actions Workflow File
Inside your project, create the workflow directory and file:
|
sudo mkdir -p /tmp/myapp-local sudo nano .github/workflows/deploy.yml |
|---|
Add the following workflow configuration:
|
name: Deploy to Production on: push: branches: – main jobs: deploy: runs-on: ubuntu-latest steps: – name: Checkout code uses: actions/checkout@v3 – name: Set up Node.js uses: actions/setup-node@v3 with: node-version: ’20’ – name: Install dependencies run: npm install – name: Run tests run: npm test – name: Deploy to server via SSH uses: appleboy/ssh-action@master with: host: ${{ secrets.SERVER_HOST }} username: ${{ secrets.SERVER_USER }} key: ${{ secrets.SSH_PRIVATE_KEY }} script: | cd /var/www/myapp git pull origin main npm install –production pm2 restart myapp |
|---|
Commit and push this workflow file to your GitHub repository:
|
sudo git add .github/ sudo git commit -m “Add GitHub Actions deployment workflow” |
|---|


Finally, push this workflow file to your GitHub repository:
|
sudo git push production main |
|---|

Once pushed, GitHub will automatically detect the workflow file and run the pipeline on every subsequent push to the main branch. Navigate to the Actions tab in your GitHub repository to watch the pipeline execute in real time.
Important: Before this workflow can deploy to your server, add three repository secrets in GitHub under Settings → Secrets and variables → Actions:
- SERVER_HOST — Your server’s IP address or domain name
- SERVER_USER — The SSH username (e.g., ubuntu)
- SSH_PRIVATE_KEY — The private SSH key used to connect to your server
Method 3: GitLab CI/CD for Automatic Deployment
GitLab CI/CD is GitLab’s built-in pipeline system configured through a .gitlab-ci.yml file in the root of your repository. It is widely adopted in enterprise environments and teams that self-host their Git infrastructure.
Real-World Example: Create the GitLab CI/CD Pipeline File
In the root of your project, create the GitLab CI/CD configuration:
|
sudo nano .gitlab-ci.yml |
|---|
Add the following pipeline configuration for a Python Django application:
|
stages: – test – deploy test: stage: test image: python:3.11 script: – pip install -r requirements.txt – python manage.py test deploy_production: stage: deploy only: – main script: – apt-get update -qq && apt-get install -y openssh-client – eval $(ssh-agent -s) – echo “$SSH_PRIVATE_KEY” | ssh-add – – ssh -o StrictHostKeyChecking=no $SERVER_USER@$SERVER_HOST “ cd /var/www/djangoapp && git pull origin main && pip install -r requirements.txt && python manage.py migrate && sudo systemctl restart gunicorn” |
|---|
Commit this file to your GitLab repository:
|
sudo git add .gitlab-ci.yml sudo git commit -m “Add GitLab CI/CD pipeline configuration” sudo git push production main |
|---|

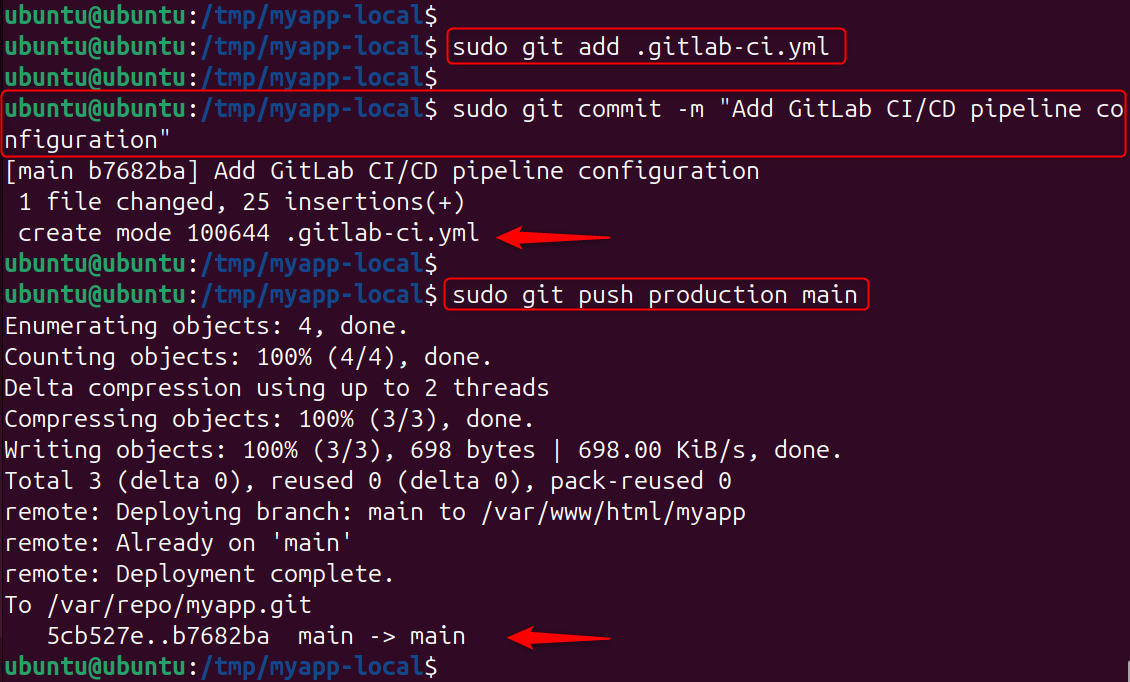
GitLab will automatically find .gitlab-ci.yml and run the pipeline. The test stage is executed first, and deployment can only take place when all tests are successful, so that broken code is never deployed to production.
Git Branching Strategy for Automatic Deployments
The base that enables automatic deployments to be safe and predictable is a clear Git branching strategy. The most common way to use automated deployments is to adhere to the GitFlow model or, more simply, the trunk-based development model:
- main branch: The production code is always located here. Pushes or merges to main automatically deploy to the production environment.
- staging branch: Automatically publishes to the staging environment, where the QA tests are done before code gets to production.
- develop branch: automatically deploys to the development or integration environment for continuous testing while developing.
Only run automated tests, not deployments, on feature branches; never untested/untested code reaches any live environment automatically.
Security Best Practices for Git Automatic Deployments
When moving a deployment to production, new security risks arise that all DevOps engineers should consider before taking a deployment to production:
- Never put credentials in your repository. Do not store SSH keys, API tokens, database passwords, or other sensitive values that your deployment pipeline needs in environment variables. Never use environment variables to store SSH keys, API tokens, database passwords, or other sensitive values that your deployment pipeline requires.
- Don’t use personal SSH keys; use deploy keys. A deploy key is a repository-specific SSH key pair that can be used to access a repository with read-only or read-write access, so that the blast radius is minimised if that key should be compromised.
- Limit the number of branches that cause deployments. Use protected branches like main and production for deploying changes, and have branch protection rules set up that require code reviews before the branch is merged.
- Run your deployment pipeline as a non-root user. The deployment user on your server should not have full sudo/ root privileges, only the lowest possible privileges to restart the application and write to the deployment directory.
Real-World Deployment Workflow: End-to-End Example
Let’s have a look at an actual SaaS product team’s full Git automated deployment workflow:
- The developer makes a feature branch off of main and submits a pull request to GitHub.
- The test suite, linting, unit tests, and integration tests are automatically performed against the feature branch on GitHub Actions.
- When all checks return a “pass”, the Pull Request is reviewed and approved by a senior developer.
- The developer will merge the Pull Request into main.
- When someone pushes to main, GitHub Actions will trigger the production deployment workflow.
- The workflow executes the entire test suite once again, creates a production Docker image, pushes it to a Docker container registry, and directs the production server to retrieve and deploy the new image.
- It takes less than three minutes to deploy with no manual steps, and the team receives an email notification in Slack when the deployment is successful.
In the typical workflow, this is the process that all companies, from startups to publicly traded tech companies, go through, and it’s completely dependent on Git as the hub for coordination.
Conclusion
Using Git for automatic deployments eliminates manual file transfers (like FTP) by triggering updates whenever you push code to a repository. Whether you implement simple Git post-receive hooks for a personal VPS, use GitHub Actions for a SaaS application, or adopt GitLab CI/CD for an enterprise environment, the core principle remains the same: every deployment should be a predictable, repeatable consequence of a Git push, not a manual operation that depends on a specific person following a checklist correctly.
The real-world examples in this guide give you working starting points that you can adapt to your specific technology stack and infrastructure. Start with the simplest implementation that solves your current deployment pain, and evolve the pipeline as your team and application grow in complexity.