When you run a web site, API, or even a web application in a Linux server in 2026, selecting the appropriate web server is not a choice, it is the basis upon which all other components are created. And as far as bare performance, low memory footprint, and proven reliability during heavy traffic is concerned, Nginx always tops the list.
Combine that with AlmaLinux 10, a RHEL-compatible, enterprise-oriented distribution designed to be long-term stable and secure and you have one of the most production-ready server stacks of any RHEL available today, without the licensing cost of RHEL.
Nginx and AlmaLinux 10 begin with a single command. This guide will take you, regardless of your role as a system administrator configuring a new VPS, a developer deploying your first Linux web server, or a DevOps engineer codifying a server provisioning workflow, through the full process, starting with a fresh AlmaLinux 10 install to a fully functional, firewall-protected, and TLS-secured Nginx web server.
Table of Contents
- What Is Nginx and Why Use It on AlmaLinux 10?
- Prerequisites
- 3 Best Methods to Install Nginx on AlmaLinux 10
- Method 1: Install Nginx via DNF (Recommended)
- Method 2: Install from the Official Nginx Repository
- Method 3: Compile Nginx from Source
- Configure FirewallD for Nginx
- SELinux Configuration for Nginx
- Conclusion
What Is Nginx and Why Use It on AlmaLinux 10?
Nginx (also known as engine-x) is an open-source, high-performance web server and reverse proxy that is trusted by millions of production deployments around the world. Its non-blocking, event-driven design allows it to process thousands of simultaneous connections with a very small memory footprint – a major benefit over most process-per-connection servers such as Apache.
AlmaLinux 10 is an enterprise-quality, community-based Linux distribution which is binary compatible with Red Hat Enterprise Linux (RHEL) 10. It will be released in 2025 and contains new package repositories, better SELinux policy, and complete DNF package management. With AlmaLinux 10 and Nginx, you have a solid and production-ready stack of web servers that can be used in the following configurations: Static web site, PHP/Node.js application, API gateway, or reverse proxy.
Prerequisites
You should have the following conditions prior to installing Nginx on AlmaLinux 10:
- A running AlmaLinux 10 server (VPS, cloud instance, or bare metal)
- A sudo user account that is not a root.
- Terminal access to the server with SSH.
- Simple knowledge of Linux command-line operations.
- (Optional) A registered domain name that will refer to the IP of your server in server blocks and in the case of SSL.
When configuring a new AlmaLinux 10 server, it is recommended that you do the initial server configuration (create a sudo user, configure SSH keys, turn on FirewallD) first, and then continue with this guide on installing Nginx.
3 Best Methods to Install Nginx on AlmaLinux 10
Installing Nginx on AlmaLinux 10 is a simple process that I’ve personally used across multiple production servers for stable and high-performance web hosting. Once you have updated your system with sudo dnf update -y, you can install Nginx with sudo dnf install nginx -y, start and enable it with sudo systemctl start nginx and sudo systemctl enable nginx.
The guide discusses three types of installation, with the default DNF package manager, the official Nginx upstream repository, and compiling using the source because you can decide on the approach that suits your performance and module needs best.
Method 1: Install Nginx via DNF (Recommended)
The simplest and most reliable way to install Nginx on AlmaLinux 10 is through the built-in DNF package manager. This method installs a well-tested, system-integrated build that works seamlessly with SELinux, FirewallD, and systemd out of the box.
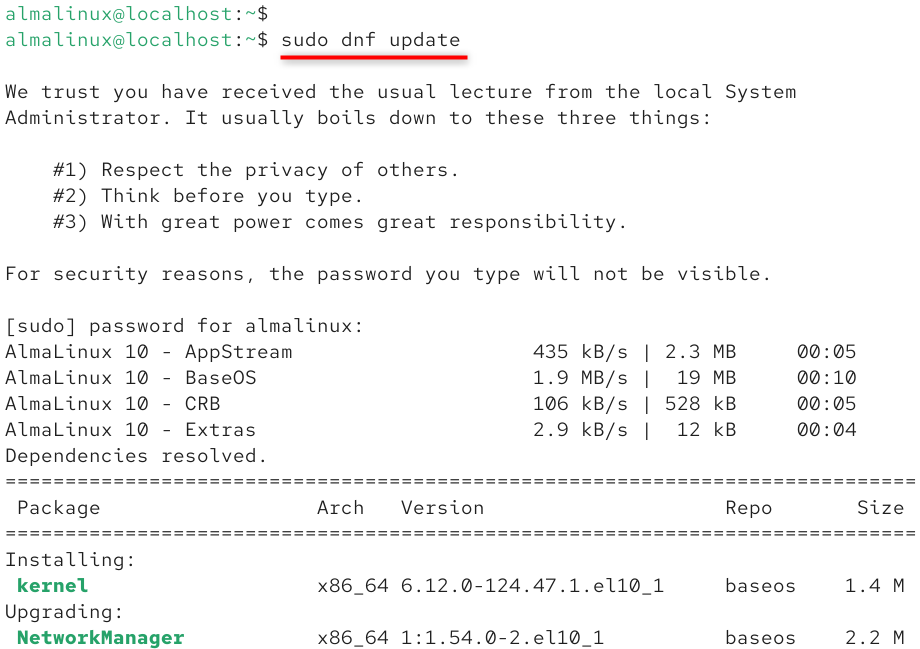
1. Update all of the system’s packages
Before installing new software, always update your system to make sure you have the most recent security fixes and compatible package versions.
|
sudo dnf update |
|---|

2. Install Nginx using DNF
From AlmaLinux 10’s default AppStream repository, install the Nginx web server package:
|
sudo dnf install -y nginx |
|---|

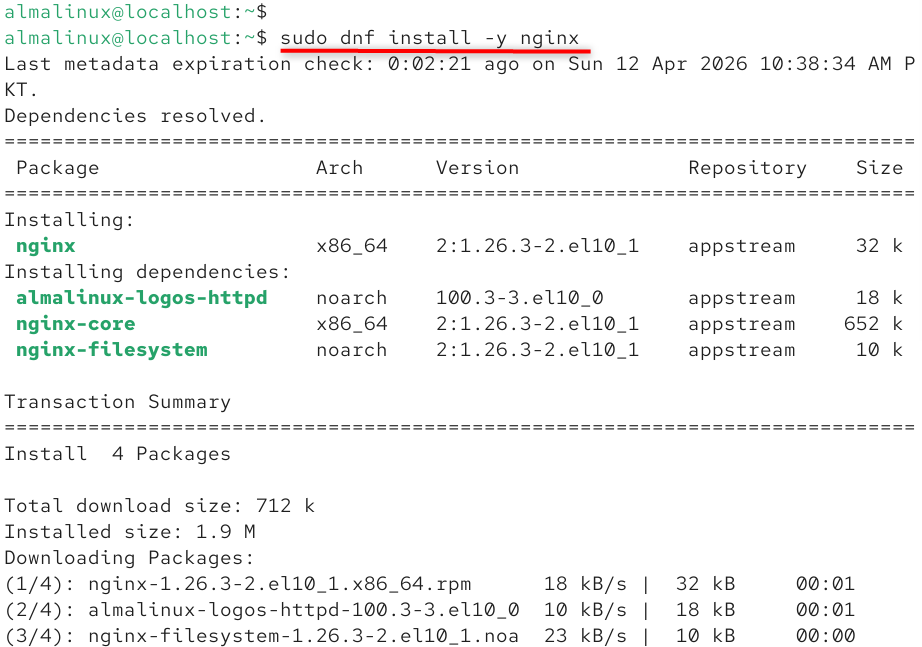
DNF will automatically find and install all of the dependencies it needs. When asked, confirm the installation.
3. Verify the installed Nginx
Check the version of Nginx that is installed:
|
nginx -v |
|---|


4. Enable and start the Nginx service
Set Nginx to start up automatically when the computer boots up, and then use this command to start it right away:
|
sudo systemctl enable nginx –now |
|---|


5. Check Nginx service status
Check to see if Nginx is running and active:
|
sudo systemctl status nginx |
|---|

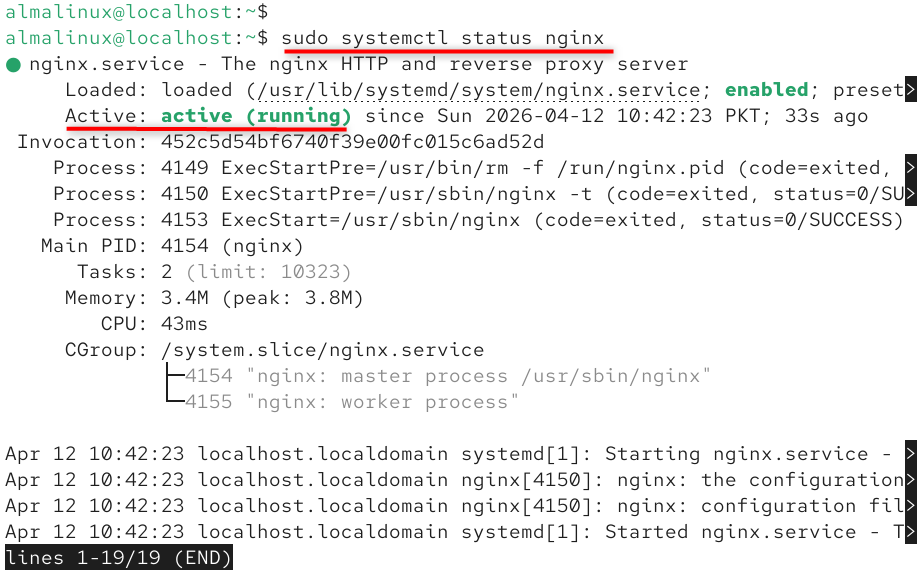
Once Nginx is running, open your browser and go to http://YOUR_SERVER_IP. You should see the default welcome page for Nginx, which means the installation worked.
Method 2: Install from the Official Nginx Repository
To get the most up-to-date stable or mainline version of Nginx with upstream support, you can add the official Nginx repository directly. This lets you get packages that the Nginx core team keeps up to date, which are often newer than what you can find in AlmaLinux AppStream.
1. Create the official Nginx repository file
Make the official Nginx repository file
|
sudo tee /etc/yum.repos.d/nginx.repo <<EOF |
|---|
[nginx-stable]
name=nginx stable repo
baseurl=https://nginx.org/packages/rhel/10/\$basearch/
gpgcheck=1
enabled=1
gpgkey=https://nginx.org/keys/nginx_signing.key
module_hotfixes=true
[nginx-mainline]
name=nginx mainline repo
baseurl=https://nginx.org/packages/mainline/rhel/10/\$basearch/
gpgcheck=1
enabled=0
gpgkey=https://nginx.org/keys/nginx_signing.key
module_hotfixes=true
EOF

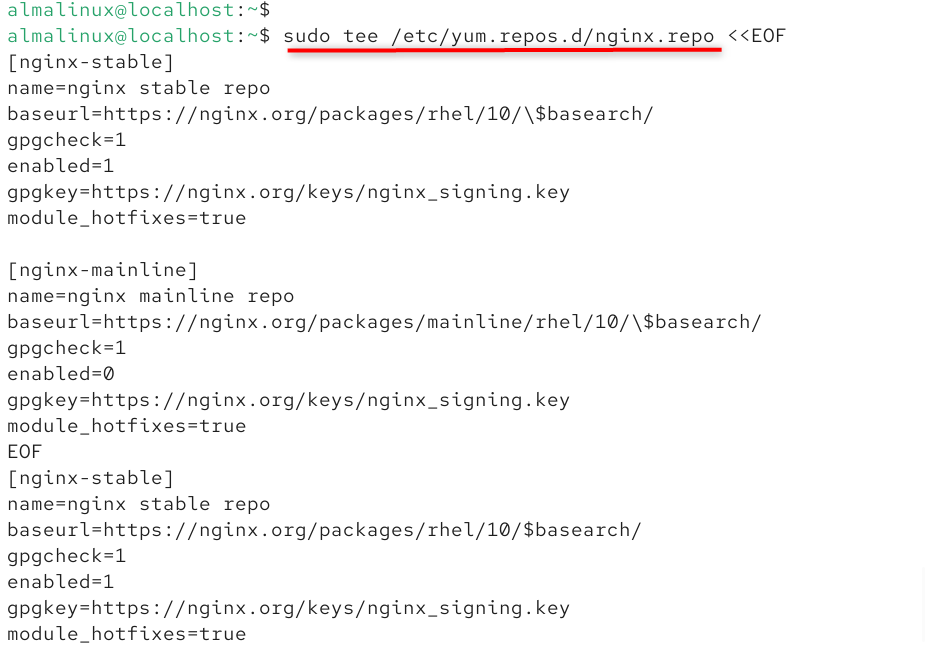
When you import the GPG key for the first time, DNF will ask you to check it. Only accept if the fingerprint matches the one on nginx.org. This stops attacks on the supply chain.
2. Clear the DNF cache and set up Nginx
Let’s setup the configuration of Nginx:
|
sudo dnf makecache sudo dnf install -y nginx |
|---|

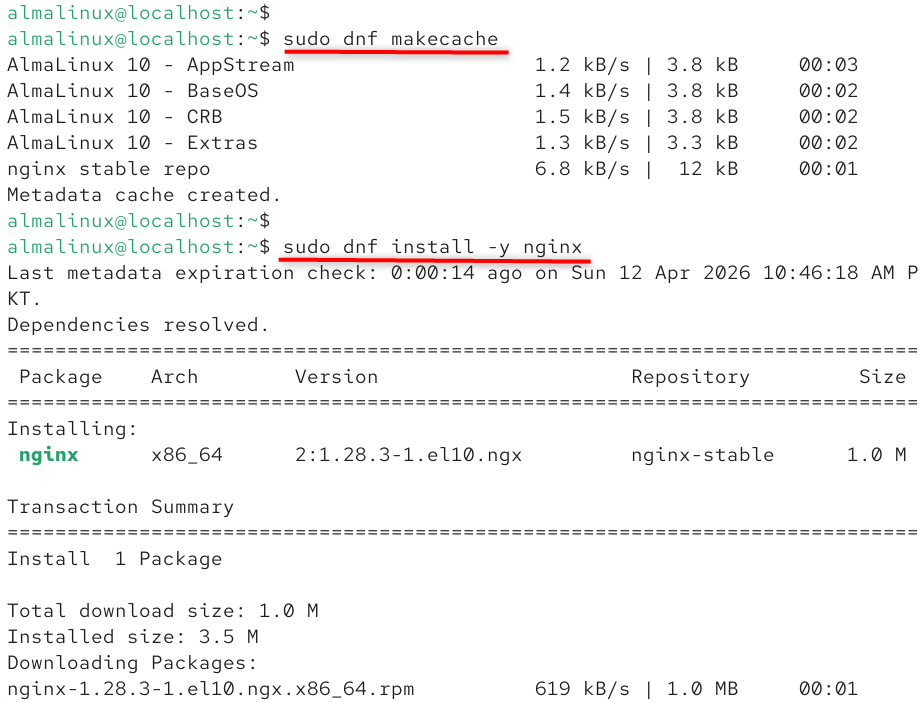
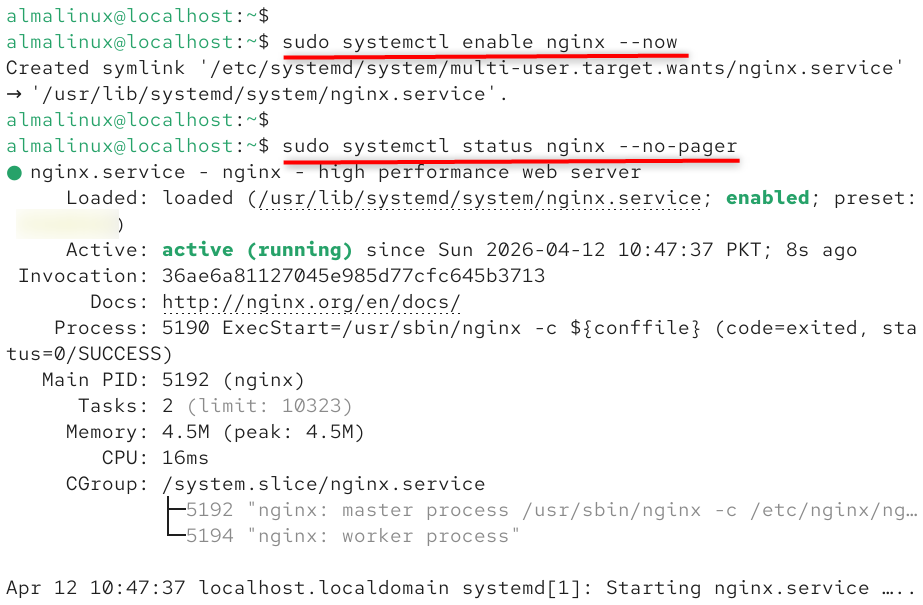
Now, enable services and verify the services via the below commands:
|
sudo systemctl enable nginx –now sudo systemctl status nginx –no-pager |
|---|

Method 3: Compile Nginx from Source
When you compile Nginx from source on AlmaLinux 10, you have the most control over which modules are included, where it is installed, and how well it works. This method is best for experienced sysadmins who need third-party modules or options that aren’t standard at compile time.
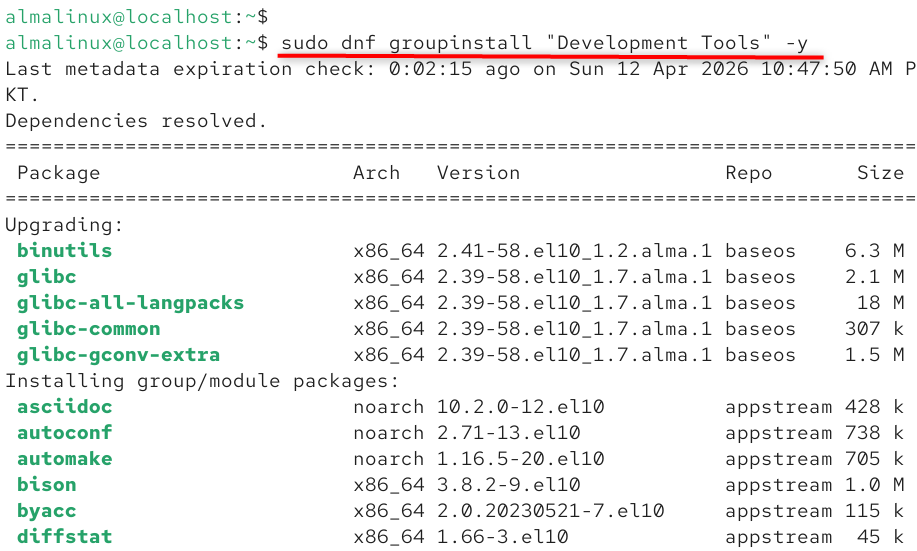
1. Install dependencies
Now, install the dependencies needed for building:
|
sudo dnf groupinstall “Development Tools” -y |
|---|

2. Create a dedicated nginx system user
In this step, create a dedicated nginx system user:
|
sudo useradd -r -s /sbin/nologin nginx |
|---|


3. Download, configure, and compile the Nginx source
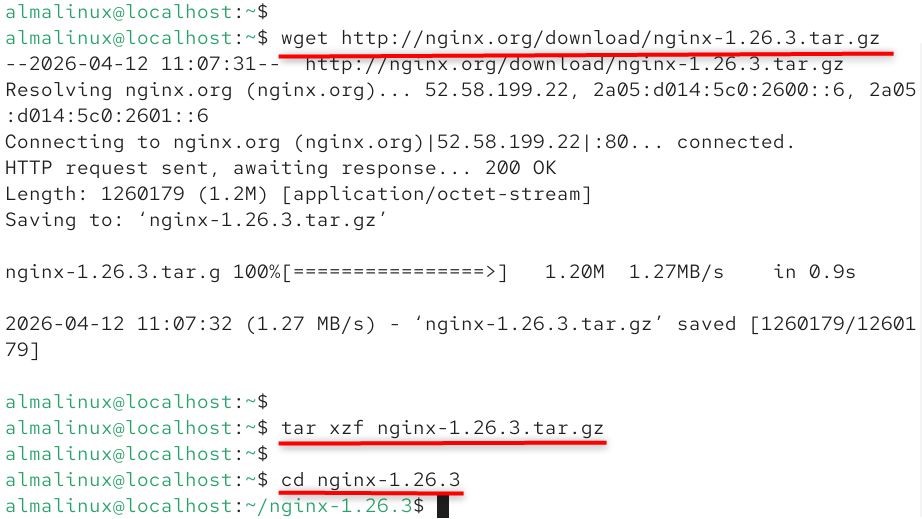
Now, download the Nginx source code, set it up, and compile it.
|
wget http://nginx.org/download/nginx-1.26.3.tar.gz tar xzf nginx-1.26.3.tar.gz cd nginx-1.26.3 |
|---|

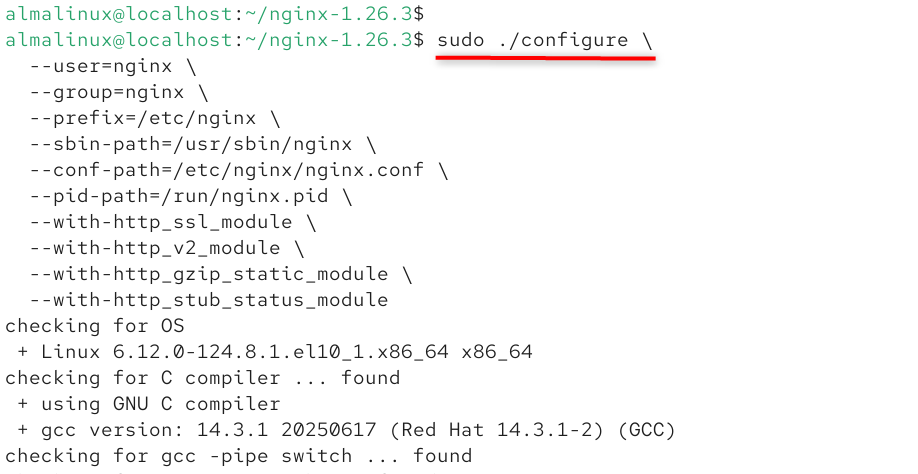
Now, configure the Nginx:
|
sudo ./configure \ –user=nginx \ –group=nginx \ –prefix=/etc/nginx \ –sbin-path=/usr/sbin/nginx \ –conf-path=/etc/nginx/nginx.conf \ –pid-path=/run/nginx.pid \ –with-http_ssl_module \ –with-http_v2_module \ –with-http_gzip_static_module \ –with-http_stub_status_module |
|---|

After that, execute the make and sudo make install command to complete the installation process.
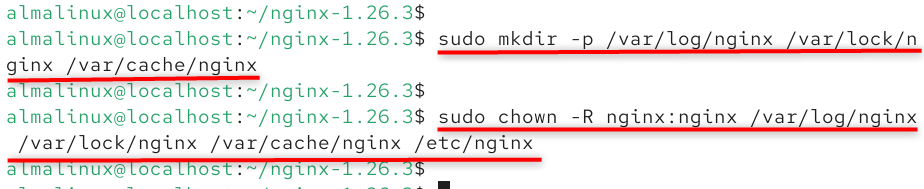
4. Make directories and set permissions
Make the necessary directories and give them the right permissions:
|
sudo mkdir -p /var/log/nginx /var/lock/nginx /var/cache/nginx sudo chown -R nginx:nginx /var/log/nginx /var/lock/nginx /var/cache/nginx /etc/nginx |
|---|

When you install from source, you have to make a systemd service unit file by hand and deal with SELinux policies. Method 1 (DNF) is the best choice for most production deployments because the packaged installation takes care of everything on its own.
Setup FirewallD for Nginx
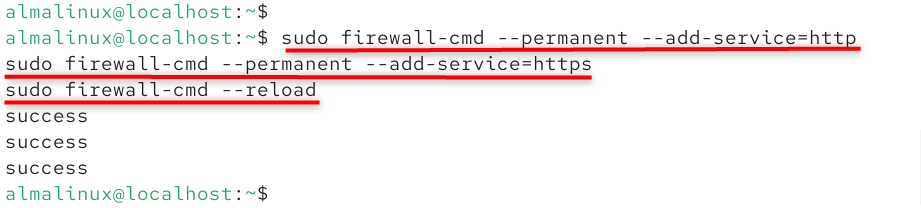
FirewallD is turned on by default in AlmaLinux 10. Port 80 (HTTP) and port 443 (HTTPS) are used by Nginx. Before people can access your server from the outside, you need to let these through the firewall.
1. Allow HTTP and HTTPS traffic
Let HTTP and HTTPS traffic through:
|
sudo firewall-cmd –permanent –add-service=http sudo firewall-cmd –permanent –add-service=https sudo firewall-cmd –reload |
|---|

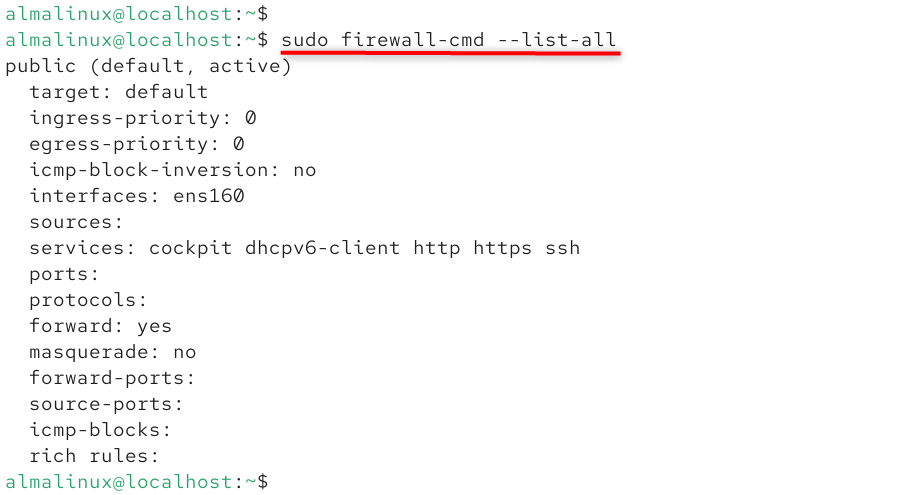
2. Verify the firewall rules
Check the rules for the firewall:
|
sudo firewall-cmd –list-all |
|---|

Setting up SELinux for Nginx on AlmaLinux 10
By default, AlmaLinux 10 uses SELinux in enforcing mode, which adds an important layer of security. However, this means that Nginx needs to be set up in a certain way to work properly, especially when it is acting as a reverse proxy or serving content from directories that aren’t the default ones.
Give Nginx permission to connect to other servers (reverse proxy). If you set up Nginx as a reverse proxy to send requests to a backend (like Node.js or PHP-FPM), turn on the httpd_can_network_connect boolean:
|
sudo setsebool -P httpd_can_network_connect 1 |
|---|


For database connections specifically:
|
sudo setsebool -P httpd_can_network_connect_db 1 |
|---|


Don’t turn off SELinux to fix Nginx permission errors. This is a big risk to security. Instead, only enable the specific booleans or file contexts that your configuration needs.
Conclusion
To install Nginx on AlmaLinux 10, open a terminal and type sudo dnf install nginx -y. Then, to enable and start the service, type sudo systemctl enable –now nginx. You can check that it is running by typing “sudo systemctl status nginx.” To let web traffic through the firewall, type “sudo firewall-cmd –permanent –add-service=http && sudo firewall-cmd –reload.”
From an expert’s point of view, it’s also important to set up the firewall (firewall-cmd –add-service=http –permanent) and check the service status to make sure everything works safely and well. AlmaLinux’s compatibility with RHEL makes it stable over time, which is why system administrators recommend this method for setting up scalable Nginx web servers.